Coding, SwiftUI

Paths

Paths –

So, earlier this week I was learning how to use the Charts framework and started customizing the symbols. There are a bunch of basic ones (see the BasicChartSymbolShape struct). You can also pass in a custom view to use as a symbol. This is cool, but I thought it might be cool to build my own custom shape.

To create a custom symbol shape (like BasicChartSymbolShape) you must conform to the ChartSymbolShape protocol (which conforms to the Shape protocol). So how do we do this? The easiest way to find out is create a struct and declare it’s conformance and see what the compiler says:

stuck CustomChartSymbolShape: ChartSymbolShape {

}

Of course, the compiler informs us that we neither conform to ChartSymbolShape nor Shape, but it offers to help us. Lets select fix:

struct AppChartSymbolShape: ChartSymbolShape {
    var perceptualUnitRect: CGRect
    
    func path(in rect: CGRect) -> Path {
        
    }
}

Perfect. Now we’re cooking. First things first, let’s provide a path. Path is a SwiftUI struct used to create all sorts of shapes (like Circle or Rectangle). I’ve got an app called StemFox whose logo is a fox face sorta shaped like a book. After some trial and error I came up with this:

// 1. Declare conformance to shape
struct StemFox: Shape {
    // 2. Create the path
    func path(in rect: CGRect) -> Path {
        
        // 3. helper variables
        let maxX = rect.maxX
        let midX = rect.midX
        let maxY = rect.maxY
        let minX = rect.minX
        let minY = rect.minY
        
        // 4. Adjust for frame location differences
        let yDifference = maxY - minY
        let yLower = 2 * yDifference / 3 + minY
        let yUpper = yDifference / 3 + minY

        // 5. Construct the path
        var path = Path()

        path.move(to: CGPoint(x: minX, y: minY))
        path.addLine(to: CGPoint(x: midX, y: yUpper))
        path.addLine(to: CGPoint(x: maxX, y: minY))
        path.addLine(to: CGPoint(x: maxX, y: yLower))  
        path.addLine(to: CGPoint(x: midX, y: maxY))
        path.addLine(to: CGPoint(x: minX, y: yLower))
        path.addLine(to: CGPoint(x: minX, y: minY))

        return path
    }
}

What’s going on here:

  1. We create a shape called StemFox and conform to the Shape protocol.
  2. To conform to Shape, we must provide the path(in rect: CGRect) method
  3. We create some helper variables, just for reference.
  4. We must scale our positions appropriately. If we don’t do this step, and instead only used something like maxY / minY here, the shape would only work as a stand alone view whose origin is always at (0,0). The rect passed in when used for data points in charts are in the space of the chart as a whole, with the origin bouncing all over the place. Without this step, the rendering gets very odd indeed.
  5. With all the math done, we just connect the dots to draw our shape.

We can use StemFox in SwiftUI like any other shape:

StemFox()
    .frame(width: 50, height: 50)

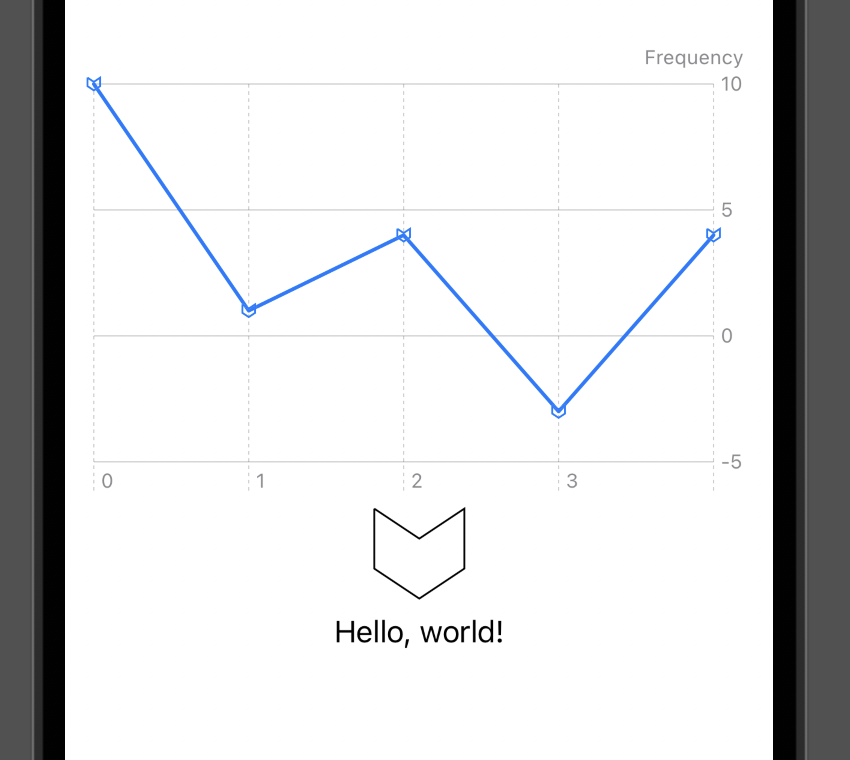
And it produces a fair rendition of the original logo:

Results from StemFox()

As cool as this looks, most Chart symbols are outlines, so let’s make this an outline. We can do this by returning the stroked path version of our path: return path.strokedPath(StrokeStyle()). This results in a very nice outline:

Results from StemFox() when returning path.strokedPath(.StrokedStyle())

Awesome! Now lets use this shape in our AppChartSymbolShape:

struct AppChartSymbolShape: ChartSymbolShape {
 
    var perceptualUnitRect: CGRect

    func path(in rect: CGRect) -> Path {
        StemFox()
            .path(in: rect)
    }
}

Now we just need to create an extension on ChartSymbolShape to enable easy use:

extension ChartSymbolShape where Self == AppChartSymbolShape {
    /// StemFox symbol.
    static var stemFox: AppChartSymbolShape {
        AppChartSymbolShape(perceptualUnitRect: .unit)
    }
}

// And for ease of use
extension CGRect {
    static var unit: CGRect {
        CGRect(origin: .zero, size: .unit)
    }
}

extension CGSize {
    static var unit: CGSize {
        CGSize(width: 1, height: 1)
    }
}

Finally we are ready to use it in a chart:

import Charts

struct Info: Identifiable {
    let id = UUID()
    let value: Double
    let date: Int
}

let data = [
    Info(value: 10, date: 0),
    Info(value: 1, date: 1),
    Info(value: 4, date: 2),
    Info(value: -3, date: 3),
    Info(value: 4, date: 4),
]

struct ContentView: View {
    var body: some View {
        VStack {
            
            Chart(data) { data in
                LineMark(
                    x: .value("Date", data.date),
                    y: .value("Frequency", data.value)
                )
                .symbol(.stemFox)
            }
            .frame(height: 250)
            .chartYAxisLabel(position: .automatic, alignment: .trailing, content: {
                Text("Frequency")
            })
            
            StemFox()
                .frame(width: 50, height: 50)
            
            Text("Hello, world!")
        }
        .padding()
    }
}

This code yields the following chart and shape:

Final product!

Not difficult and kinda fun!

Further Reading:

https://www.hackingwithswift.com/books/ios-swiftui/creating-custom-paths-with-swiftui

https://developer.apple.com/documentation/swiftui/shape

https://developer.apple.com/documentation/charts/chartsymbolshape

Swift

Decoding Codable Code

I’ve been working on a recent project where I’ve been interacting with remote data. This data is delivered in JSON format. JSON (or its Swift equivalent Dictionary<String, Any>) are not exactly type safe. Seeing as type safety is a key feature of Swift, it make sense to translate this data into classes or structures. This post discusses how to do this.

The Data

For our example lets suppose we have an API that provides a list of albums and songs by Weird Al Yankovich. For convenience, instead of setting up an actual API endpoint to call I’ve taken a small sample and translated it into a JSON file. Download this and add it into your project. This is what the raw JSON looks like:

 [
  {
  "release_date":487915200,
  "title":"Dare to Be Stupid",
  "tracks":[
            {
            "length":212,
            "parody_of":"\"Like a Virgin\" by Madonna",
            "sequence":1,
            "title":"\"Like a Surgeon\"",
            "writers":"William Steinberg, Thomas Kelly, Alfred Yankovic"
            },
            {
            "length":205,
            "parody_of":"Style parody of Devo",
            "sequence":2,
            "title":"\"Dare to Be Stupid\"",
            "writers":"Yankovic"
            },
            {
            "length":184,
            "parody_of":"\"I Want a New Drug\" by Huey Lewis and the News",
            "sequence":3,
            "title":"\"I Want a New Duck\"",
            "writers":"Christopher Hayes, Hugh Cregg III, Yankovic"
            },
            {
            "length":244,
            "parody_of":"Style parody of Elvis Presley-like Doo-wop",
            "sequence":4,
            "title":"\"One More Minute\"",
            "writers":"Yankovic"
            },
            {
            "length":238,
            "parody_of":"\"Lola\" by The Kinks",
            "sequence":5,
            "title":"\"Yoda\"",
            "writers":"Raymond Davies, Yankovic"
            },
            {
            "length":65,
            "parody_of":"Cover of titular television theme",
            "sequence":6,
            "title":"\"George of the Jungle\"",
            "writers":"Stan Worth, Sheldon Allman"
            },
            {
            "length":263,
            "parody_of":"Style parody of 1950s sci-fi soundtracks",
            "sequence":7,
            "title":"\"Slime Creatures from Outer Space\"",
            "writers":"Yankovic"
            },
            {
            "length":288,
            "parody_of":"\"Girls Just Want to Have Fun\" by Cyndi Lauper",
            "sequence":8,
            "title":"\"Girls Just Want to Have Lunch\"",
            "writers":"Robert Hazard, Yankovic"
            },
            {
            "length":186,
            "parody_of":"Style parody of 1920s and 1930s music",
            "sequence":9,
            "title":"\"This Is the Life\"",
            "writers":"Yankovic"
            },
            {
            "length":198,
            "parody_of":"Original",
            "sequence":10,
            "title":"\"Cable TV\"",
            "writers":"Yankovic"
            },
            {
            "length":233,
            "parody_of":"A polka medley including:",
            "sequence":11,
            "title":"\"Hooked on Polkas\"",
            "writers":""
            }
            ]
  }
  ]

If you are skilled at reading JSON, you should see that this is an array of albums. Each album is represented by a dictionary with keys release_date, title, and tracks. These keys have types of date, string and array of dictionaries respectively. Watch track dictionary contains keys length, parody_of, sequence, title, and writers.

We access the JSON file’s information like so:

let path = Bundle.main.path(forResource: "WierdAlAlbums", ofType: "json")!
let data = NSData.init(contentsOfFile: path)! as Data
let albums = try! JSONSerialization.jsonObject(with: data, options: []) as! [[String:Any]]

albums is an array of dictionaries. If we want to get an album, and read its title we would need to do some unwrapping and casting:

let firstAlbumName = ((albums.first!)["title"] as! String

This should make any Swift developer cringe (and perhaps vomit in their mouth. ??) We are accessing the dictionary data with hardcoded strings (easy to mistype, hard to remember, etc) then force unwrapping the value. Barf! Additionally, each time we need to access the title, we need to do it all over again. That doesn’t seem very DRY. All in all, this is sub optimal way to handle this information. Lets see what we can do to clean this up.

The first and most important step to cleaning up and simplifying this mess is to create our own types that represent the data. This approach provides several benefits, with type safety and DRY code at the top of the list. Lets get started. We can represent our albums and track data with the following structs:

struct Album {
    // 1
    enum DictionaryKey:String{
        case title, release_date, tracks
    }
    // 2
    let title:String
    let release_date:Date
    let tracks:[Track]
    // 3
    init(from dict:[String:Any]){
        title = dict[DictionaryKey.title.rawValue] as! String
        // 3.1
        let timeInterval = dict[DictionaryKey.release_date.rawValue] as! TimeInterval
        release_date = Date.init(timeIntervalSince1970: timeInterval)
        // 3.2
        let trackData = dict[DictionaryKey.tracks.rawValue] as! [[String:Any]]
        tracks = trackData.map({ (data) -> Track in
            return Track(from: data)
        })
    }
}

struct Track{
    
    enum DictionaryKey:String{
        case length, parody_of, sequence, title, writers
    }
    
    let length:Int
    let parody_of:String
    let sequence:Int
    let title:String
    let writers:String
    
    init(from dict:[String:Any]){
        length = dict[DictionaryKey.length.rawValue] as! Int
        parody_of = dict[DictionaryKey.parody_of.rawValue] as! String
        title = dict[DictionaryKey.title.rawValue] as! String
        writers = dict[DictionaryKey.writers.rawValue] as! String
        sequence = dict[DictionaryKey.sequence.rawValue] as! Int
    }
}

Lets go over what is happening here. First we have declared two structs, Album and Track. Their internal structure is very similar, so we will just review the key points of Album:

  1. We have an enum that has a case for each key in the dictionary for the data that represents the Album. Since we have declared the enum to be of type string, we can use its raw value to access the value in the dictionary. We do this to keep our code DRY (anytime we need to access a key of a dictionary representing a dictionary we use these keys). Secondly, we avoid misspelling by using an enum case.
  2. We have struct variables that represent a value for each key in the album dictionary.
  3. We have created an initializer that takes a dictionary and use the previous two steps to map the data from the dictionary to the correct struct variable.
    1. Since JSON doesn’t store date information directly, we translate from the time interval to the date we need. In some cases this may be a string translation, and a DateFormatter will be needed.
    2. Since the track data is an array of dictionaries we need to map the dictionaries to Tracks. We can do this either in a for loop, or via the map function (as shown above).

With these steps we can quickly and efficiently map or data from dictionaries to value types that provide type safety when accessing its information. No more forced unwrapping every time we want to use an album’s title, or a tracks sequence. While this solution is great it can be improved!

While the above code is great, we need to translate our array of dictionaries created from the JSONSerialization into these structs:

let data = NSData.init(contentsOfFile: path)! as Data
let albumsData = try! JSONSerialization.jsonObject(with: data, options: []) as! [[String:Any]]
let albums = albumsData.map{return Album(from:$0)} // albums is of type [Album]

Now that our data has been translated into these structs, we are able to access information safely and efficiently.

While the above code is good, I can’t help but wonder if there is a better way. We take data (Data type), transform it into another kind of data ([[String:Any]]) then translate that into yet another type of data ([Album]). Is there anyway we can skip the middle step and go from Data to [Album]?

Codable

Da-da-da-da! The Codable protocol is perfect for this situation.  If something conforms to the Codable protocol, then it is able to convert itself into and out of an external representation. I our case, we are converting from a JSON data object to our structs. (Its good to note that Codable is a type alias that conforms to both the Decodable and Encodable protocols.) To explore our use of the Codable protocol, let us examine how it changes our struct representation:

struct Album:Codable{
    let title:String
    let release_date:Date
    let tracks:[Track]
}

struct Track:Codable{
    let length:Int
    let parody_of:String
    let sequence:Int
    let title:String
    let writers:String
}

Hmmmm… That simplified things quite a bit. All we are left with are the struct variables. ‘How do we use this?’ you may ask.  I’ll show you:

let albums = try! decoder.decode([Album].self, from: data )// albums is of type [Album]

Boosh! Thats sweet! I love when things simplify. Its good to note that this works so well because our struct variable names are the same as the JSON keys. Hence the awkward release_date and parody_of variable names. They don’t exactly match the lower camel case structure that swift uses. Luckily for us, there is a way to fix this. First lets see how our struct code changes:

struct Album:Codable{
    let title:String
    let releaseDate:Date
    let tracks:[Track]
    
    // 1
    enum CodingKeys: String, CodingKey{
        // 2
        case title, tracks
        // 3
        case releaseDate = "release_date"
    } 
}

struct Track:Codable{
       
    let length:Int
    let parodyOf:String
    let sequence:Int
    let title:String
    let writers:String

    enum CodingKeys: String, CodingKey{ 
        case parodyOf = "parody_of"
        case length, sequence, title, writers 
    }
}

The only difference between the code above, and our earlier definition is the addition of the CodingKeys enum. Lets go over each part of this enum:

  1. The enum is titled CodingKeys, has a String raw type and conforms to the CodingKey protocol. This protocol indicates that these enum cases may be use for encoding and decoding. Each case in our enum represents a variable name in the struct.
  2. We must list any of the struct’s variable names we want to encode/decode. So we first list the ones that match our JSON keys, just to get them out of the way.
  3. Since our struct variable name releaseDate is different from the JSON key representing that data, we must map the raw value to the enum case, thus releaseDate.rawValue = "release_date".

Running our code works great! We can now map our JSON information to our structs while also adhering to Swift API design guidelines. Yay! Except that I’m lying. While the code runs, and mostly works, we still have a problem. Remember how we needed to translate the date data using the timeIntervalSince initializer (3.1 above)? Yeah, that still needs to happen, but its not. While the above code compiles, runs, and returns an array of albums, a closer inspection of the return shows that something is not quite right:

print(albums.first!.releaseDate)// prints 2016-06-18 04:00:00 +0000

Yup, I’m fairly sure Dare to Be Stupid came out in 1985, not 2016… We have several solutions we could use to solve this. First, we could store the timeInterval data as a private variable and provide releaseDate as a computed variable:

struct Album:Codable{
    let title:String
    var releaseDate:Date{
        return Date(timeIntervalSince1970: releaseDateTimeInterval)
    }

    let tracks:[Track]
    private let releaseDateTimeInterval:TimeInterval

    enum CodingKeys: String, CodingKey{
        case releaseDateTimeInterval = "release_date"
        case title, tracks
    }
    
}

This works. However, I’m not sure I like the storage of data I don’t really need or want. Our other option is to write our own custom decoder init function:

struct Album:Codable{
    let title:String
    var releaseDate:Date
    let tracks:[Track]

    enum CodingKeys: String, CodingKey{
        case releaseDate = "release_date"
        case title, tracks
    }
    
    // 1
    init(from decoder: Decoder) throws {
        // 2
        let values = try decoder.container(keyedBy: CodingKeys.self)
        // 3
        title = try values.decode(String.self, forKey: .title)
        // 4
        let timeInterval = try values.decode(Double.self, forKey: .releaseDate)
        releaseDate = Date.init(timeIntervalSince1970: timeInterval)
        // 5
        tracks = try values.decode([Track].self, forKey: .tracks)
    }
}

Lets go over this initializer:

  1. The first thing to note is that this is overriding the default initializer provided by conforming to the decodable protocol.
  2. The first thing we need to do, its to start accessing the information inside the decoder. We do this by calling the container method. This returns a keyed decoding container, that uses the keys we passed in (CodingKeys)
  3. We use the values decoding container to access the information we need. In this case we are getting the title information. We do so by calling the decode method and passing in the type we are expecting and the key we are trying to access. In this case we are expecting a String, for the key .title.
  4. This step is why we are writing this custom initializer. We recognize that the key releaseDate doesn’t contain the date that we need, but rather the time interval needed to translate to the date we need. So we decode the data into a double, then in the next line convert that into the date we need and initialize the releaseDate variable.
  5. Finally, it is worth noting that the decode method can decode into any type that conforms to the Decodable protocol, also that the built in types of Array, Dictionary, and Optional all conform to Codable (and hence Decodable) if they contain codable types. So, in this case since Track is codable, then [Track] is also codable, and we can use the decode method to decode the data for the tracks key into our tracks array!

If you print the album title again, it yields:

print(albums.first!.releaseDate)// prints 1985-06-18 04:00:00 +0000

Which is, of course, what we were all expecting. While we have only chosen to override the init function, if you need to subsequently encode this data (perhaps a user is allowed to alter it and send it back up) then you would also need to implement your own custom encode method.

TL;DR

Conform your classes and structs to the Codable protocol for easy translation of JSON (or any other codable type) to the type of object that you are using!

You can customize your implementation to better conform to proper Swift API design and translate data into different form upon encoding and decoding.

Sources

https://developer.apple.com/documentation/foundation/archives_and_serialization/encoding_and_decoding_custom_types

https://developer.apple.com/documentation/swift/codable

https://developer.apple.com/documentation/swift/encodable

https://developer.apple.com/documentation/swift/decodable

https://www.objc.io/blog/2018/02/06/networking-with-codable/

https://developer.apple.com/documentation/foundation/archives_and_serialization/using_json_with_custom_types

Frameworks, Swift

Proper Presentations

Aristotle once said:

The aim of art is to represent not the outward appearance of things, but their inward significance.

Such is the aim of our UI’s. A good UI helps users navigate the utility that the app provides them. It enhances the experience without distracting from the purpose of the application.

As developers, our job is to aid designers in delivering this experience. UIKit provides a lot of tools we can use to build our applications. I would like to discuss a UIKit protocol that has made my life as a developer so much easier: UIAppearance

UIAppearance inherits from NSObjectProtocol and its job is to customize the appearance of instances of any class that adopts the protocol. Whats great about this is that it is adopted by UIBarItem and UIView. This means that you can customize the appearance of any subclass of UIView and UIBarItem

So how do we use this? Lets start with a simple example. Suppose you are developing an application that utilizes navigation controllers. In fact lets say that there are multiple views, each with their own navigation controllers. Your designer has determined that they would like the navigation bar to be TARDIS blue. There are several solutions to this problem. A common one that I have seen developers use is to subclass UINavigationController and override its viewDidLoad method to set the navigation bar color there like so:

class MyNavigationViewController: UINavigationController {
    override func viewDidLoad() {
        super.viewDidLoad()
        self.navigationBar.barTintColor = UIColor.tardisBlue
    }
}

This works, but it requires you to use this subclass for every instance of UINavigationController and only alters the navigation bar within the scope of this particular navigation controller. This seems inefficient (and indeed it is!).

Because UINavigationBar inherits from UIView, it conforms to the UIAppearance protocol and we can customize the appearance of every UINavigationBar outside of any particular scope. We can do this with the following line of code:

UINavigationBar.appearance().barTintColor = UIColor.tardisBlue

That one line of code sets the tin color for all navigation bars in your application. One thing to note is that these appearance changes are applied as a view enters a view. If you change an appearance while a view is displayed, nothing will happen. You will need to remove the view from the view hierarchy and then put it back. With this in mind, I recommend setting all your custom appearances in the app delegate didFinishLaunchingWithOptions method.

I personally like to create a struct called Appearance that has a single static function that sets all the appearances in my applications:

import UIKit

struct Appearances{
    static func set(){
        UINavigationBar.appearance().barTintColor = UIColor.tardisBlue
        UINavigationBar.appearance().tintColor = UIColor.white
        UINavigationBar.appearance().titleTextAttributes = [NSAttributedStringKey.foregroundColor:UIColor.white]
       ...
    }
}

Calling Appearances.set() in the didFinishLaunchingWithOptions method gives all navigation bars a blue tint, with white buttons, and white titles. And I never have to think about it again. Better yet, say your designer decides to change the button tint color, or title font, etc. With this method, you have just one location to update! Boosh, programming like a boss!

Most view properties (background color, tint color, font, etc) are accessible via the appearance protocol, though I have noticed that the autocomplete is a bit sketchy.

Another cool feature this protocol gives your apps is that you can specify custom appearances for classes when they are contained in specified other classes via the appearance(whenContainedInInstanceOf:) function. For example, say we want all of our navigation bar buttons (UIBarButtonItem‘s) to have a white tint, but if they are in a tool bar, we actually want they to be blue. If this is the case, we can refine our set() function above like so:

static func set(){
    UINavigationBar.appearance().barTintColor = UIColor.tardisBlue
    UINavigationBar.appearance().tintColor = UIColor.white
    UINavigationBar.appearance().titleTextAttributes = [NSAttributedStringKey.foregroundColor:UIColor.white]
        
    UIBarButtonItem.appearance(whenContainedInInstancesOf: [UINavigationBar.self]).tintColor = UIColor.white
    UIBarButtonItem.appearance(whenContainedInInstancesOf: [UIToolbar.self]).tintColor = UIColor.tardisBlue
}


TL;DR

Use the appearance method to set app wide custom colors, fonts, etc. Be sure to set these properties before the view is loaded on screen.

import UIKit

struct Appearances{
    static func set(){
       //--- Set your custom appearance here ---
    }
}

Call Appearance.set() in your app delegate’s didFinishLaunchingWithOptions to apply these changes globally.

Sources

https://developer.apple.com/documentation/uikit/uiappearance

http://nshipster.com/uiappearance/

Localization

Internationalization – 7

Testing Your Work

This post covers some nifty tools to help you check your internationalization skills. They should help you more quickly and easily identify missing localizations or problems with your internationalization.

Interface Builder

You can use interface builder to do a basic/quick check how a localization might effect your layouts and constrains.  It has some useful tools such as double length languages and pseudolanguages. To check your work using interface builder is simple:

  1. Select the interface builder file you would like to test.
  2. Open the Assistant Editor (⌥⌘↩︎)
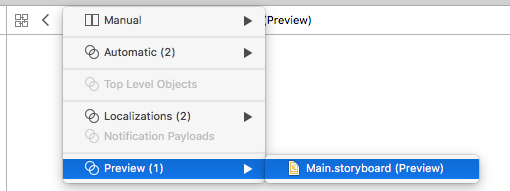
  3. From the editor jump bar, select the Preview option and choose the .storyboard or .xib file you are looking at:
  4. In the bottom right corner of the assistant editor’s window, select the language you would like to test:

Using the preview assistant allows you to spot problems with your view layout or constraints without needing to build and run. This means faster, more flexible, development and should be your first line of defense against a rigid view layout.

Testing Using the Simulator or on a Device

While Interface Builder is useful for quick testing, using the simulator (or device) allows you to completely test your localization. In a previous post I showed how you can set your localization manuals via the Settings->Language options. THIS IS A TERRIBLE IDEA! I have since seen the light hand strongly advocate the following method:

To check any language (including right-to-left, pseudolanguages, etc) on any device or simulator you:

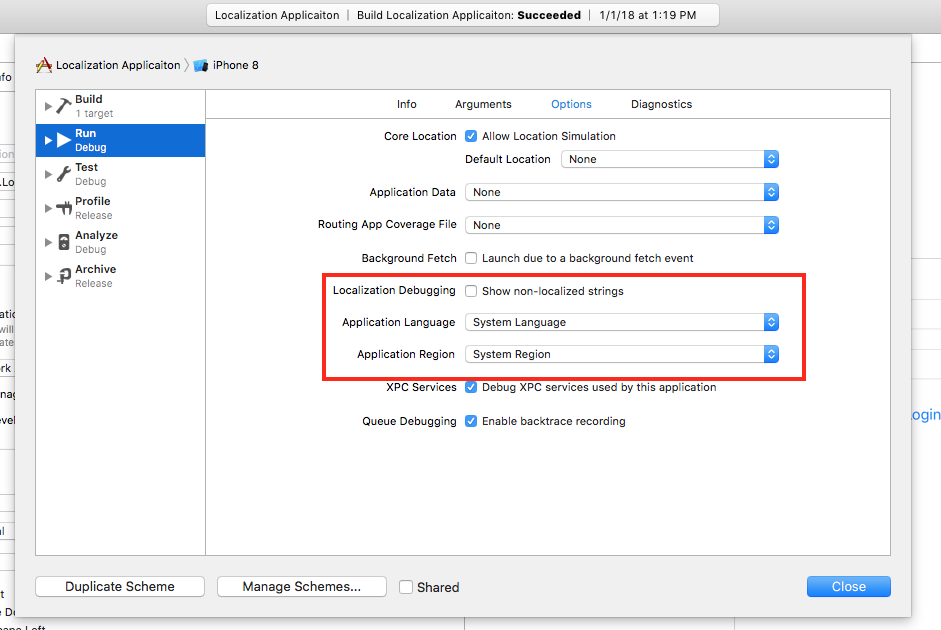
  1. Select the your target in your Run destination menu, and select Edit Scheme:
  2. Next select Options and use the Application Language, Application Region, and Localization Debugging options to test your app on every run:

I must say, finding this really helped me out. Its so easy to test any localization (even pseudolanguage and right-to-left pseudolanguage) that there is really no excuse for not doing so.

TL;DR

Use interface builder to preview localizations (including pseudolanguages and double length strings) by choosing Preview as the assistant editor and picking its language in the bottom right corner of the Preview window

You can perform a complete check for any localization (including pseudolanguages, double length, right-to-left languages, regions, etc) on any device or simulator via the scheme options.

Sources

https://developer.apple.com/library/content/documentation/MacOSX/Conceptual/BPInternational/TestingYourInternationalApp/TestingYourInternationalApp.html#//apple_ref/doc/uid/10000171i-CH7-SW1

Assets, Scripts

Accessing Assets

So, you’ve got a bunch of assets. Thats great! Xcode xcasset folders are a great way of managing your assets. And with Xcode 9, the addition of color assets makes it even better. However, there is a shortcoming. That shortcoming happens when you want to use an asset in code. To do so you need to do something like this:

let image = UIImage(named:"Image Asset Name")
let color = UIColor(named:"Color Asset Name")

Hmmm… This seems error prone. You could easily forget or mistype an assets name. This problem becomes worse the more assets you have. This seems like a perfect solution for enums.

Enums in Swift are fantastic (have I said that before?). They can have different raw types, functions, computed variables, etc. They are great! In this case we could create an enum with each assets name as a case:

enum Assets:String{
    case AssetName1
    case AssetName2
    ...
}

Then our above code would become:

let image = UIImage(named:Assets.ImageAssetName.rawValue)
let color = UIColor(named:Assets.ColorAssetName.rawValue)

This is a step up. It eliminates the need to remember/spell the asset names. We can do better! Lets extend our enum with a function that returns UIImage / UIColor objects:

extension Assets{
    var image:UIImage?{
        return UIImage(named:self.rawValue)
    }
    var color:UIColor?{
        return UIColor(named:self.rawValue)
    }
}

Or beginning code becomes:

let image = Assets.ImageAssetName.image
let color = Assets.ColorAssetName.color

This is an improvement, but we still have a couple of problems to tackle. First, our Assets enum makes no distinction between asset types. Because of this our extension to the Assets enum adds the image and color variables to all assets, wether they reference an image or not. The second problem we have is that we need to worry about adding/deleting enum cases every time we add/delete assets. This seems like an easy step to miss and not something pleasant to handle/remember. In fact it seems tedious and repetitive… Hmmmm…. Tedious and repetitive… That sounds like a job for a computer to handle!

Getting Scripty With It

Whenever I come to a situation where I need to do a job repetitively I try and script it. It gives me a chance to use python and usually solves more problems than it creates :P.

If you open up an xcasset folder you’ll find it contains subfolders; one for each asset. The folder name is the same as the asset name, plus an extension that indicates the asset type; .colorset for a color asset, .imageset for an image asset, etc. So to automate the creation of our enums, we simply need to traverse our project folders, finding folders with the .xcassets extension, then traversing their subfolders, pulling out their asset names.

While I could copy and paste the python script here, I’ve placed it into a GitHub repository instead:

https://github.com/DrCarleeknikov/XcodeAssetsScript/

Using this script is simple:

  1. Get the source code above.
  2. Copy AssetEnumCreator.py into your projects root directory.
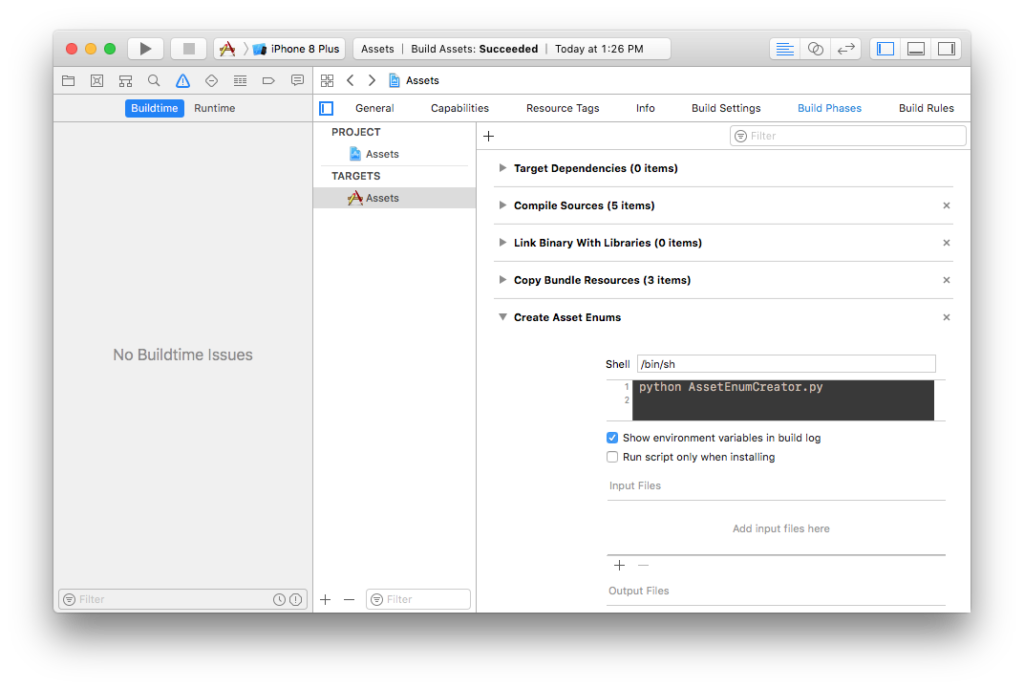
  3. Add a Run Script Phase to your target’s Build Phases and copy python AssetEnumCreator.py like so:
  4. Build (⌘B). This runs the script and will create 3 files for every .xcassets directory. These files are created in the same directory as the .xcassets (not in the .xcassets folder). For example, if you assets directory is called Assets.xcassets then the script will create the following three files in the same directory containing Assets.xcassets:
    1. ColorAssets.swift (Contains an enum with that assets color assets)
    2. ImageAssets.swift (Contains an enum with that assets image assets)
    3. AssetsUIColorExtension.swift (Contains an extension to UIColor that allows you to access the color assets via the typical UIColor static methods: UIColor.myRed
  5. Finally, you need to add these files to your project. Simply locate them in finder and drag and drop them into your project.

With these steps done, you can add/edit assets inside you .xcassets directories and then when you build, the enums and UIColor extensions will be automatically updated! Note: if you add another .xcassets directory, the build will generate the .swift files, but you will need to complete step 5 before you can use them in code.


TL;DR

Use this repository to automatically create enums/class extensions for your project assets:

https://github.com/DrCarleeknikov/XcodeAssetsScript/


Assets, Swift

Seeing Red (Or White, Or Blue)!

I’ve made it a habit when developing applications to try and stream line my work and make thinks are reusable as possible. To achieve this when dealing with colors I’ve opted to extending UIColor, rather than defining the color in-line.  For instance say we needed a view with a background color that was reddish, say, FF4800 or (255,72,0) in RBG . The most straight forward and obvious way of handling this is by simply typing:

view.backgroundColor = UIColor(red: 255/255, green: 72/255, blue: 0, alpha: 1)

However, we will probably need this color in several different places and it may be changed in the future. So, instead of needing to search through our code (being efficient developers) we should instead write an extension on UIColor that contains this color for us. This gives us a single source to reference and edit as we move forward:

extension UIColor{
    static var myRed:UIColor{
        get{
            return UIColor(red: 255/255, green: 72/255, blue: 0, alpha: 1)
        }
    }
}

Now our color assignments simply become:

view.backgroundColor = UIColor.myRed
// OR even more simply:
view.backgroundColor = .myRed

This is great, but there is a catch. What about assigning colors to UI elements developed using xib and storyboard files? Well, until recently we were hosed on that front. (I tended to simply use outlets to these items and set it in code.) However, iOS 11 and Xcode 9 give us a new tool that can be used in xib and storyboard files too!

Named Colors

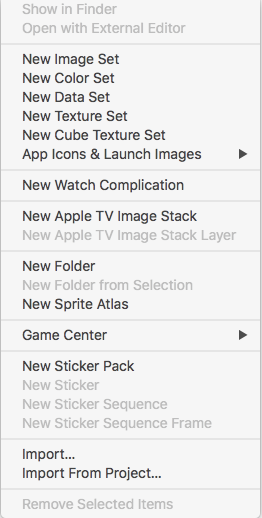
Named colors are asses added to .xcassets folders and are accessible to our interface files as well as in our code. To add a new named color click on the xcassets file you would like to add the color to, then click the plus sign at the bottom of the assets list to add a new asset and choose New Color Set option:

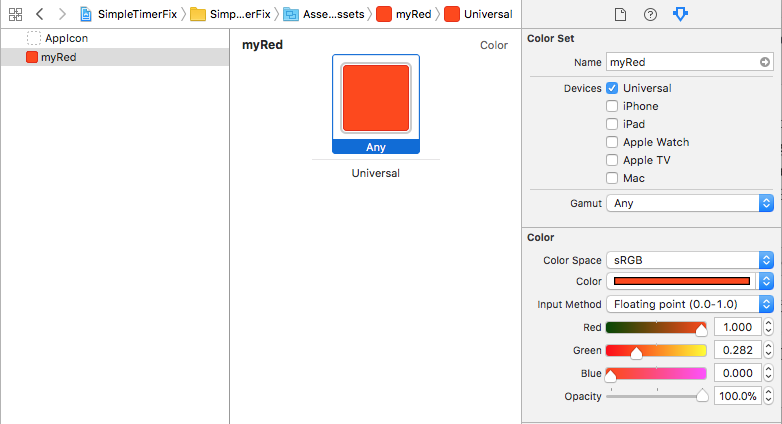
Next edit the properties of this asset, setting the name and color values you desire:

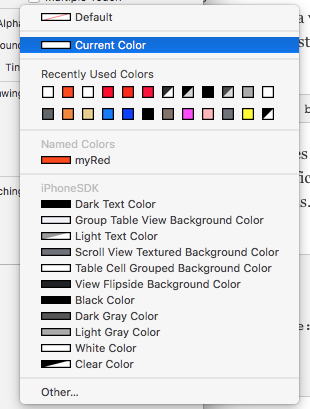
Finally, like the Little Red Hen, reap your rewards by using this color in your UI files. The color will now show up whenever you want to pick a color in an xib or storyboard file, like so:

The only thing left to do is to update our helper function so that we are not accessing the RGB values but rather accessing this new asset. We do so by using the UIColor(named:String) initializer:

extension UIColor{
    static var myRed:UIColor{
        get{
            return UIColor(named:"myRed")!
        }
    }
}

(In fact, you could easily create a script to autogenerate this code at compile time. Perhaps I’ll do a post on that next…)

Now that that is done, if you (or a designer) ever wants to edit this color they can do it in one simple place and it will instantly propagate throughout the entire code base!


TL;DR

Use named colors by adding them as assets to .xcassets files.

Simplify access to these color assets by creating extensions to UIColor (see like 10 lines above).


Sources

https://developer.apple.com/library/content/documentation/Xcode/Reference/xcode_ref-Asset_Catalog_Format/Named_Color.html

https://gist.github.com/bryanstrader/db2bc9d66c03176451a4450f09bfbc1f

Localization

Internationalization – 6

Handling Noun Plurals

So far we have covered all the basics for internationalizing your application. In this post we cover the issue of dealing with plurals and measurements.

Lets start with an example.  Say we a UI feature where we displayed in a label the number of followers a user had (by displaying something like “5 followers”). Referencing our work above, we might be tempted to do something like this:

let numFollowers = 5;
numFollowersLabel.text = NSLocalizedString(String(numFollowers) + " followers", comment: "")

This approach has several problems.  The most glaring is handling the “1 follower” edge case. No matter how many followers a user has, a proper representation of it would be “x followers”… Unless they only have one.  In that case the text should display “1 follower”. We could solve this problem with an if statement:

let numFollowers = 5
if numFollowers == 1 {
 numFollowersLabel.text = NSLocalizedString(String(numFollowers) + " follower", comment: "")
} else {
 numFollowersLabel.text = NSLocalizedString(String(numFollowers) + " followers", comment: "")
}

However, this approach clutters your code and distracts from purpose it is trying to accomplish. A better approach is to use a .stringsdict file to handle these types of cases. .stringsdict files are used to supply language-specific plural rules for localizations.  They do this by containing the plurality rules for each localized phrase in a dictionary.

To add a new .stringsdict file you choose File -> New, then choose the property List file type.  Now rename the file to something like Localizable.stringsdict.  Next localize the file as described in our first post on localization.

Since .stirngsdict files work via key-value look ups (much like regular localization) we will need to populate our file with the proper keys.  Below is how the file should look to support localization in our situation:

    <dict>
        <!-- 1 -->
        <key>%d followers</key>
        <dict>
            <!-- 2 -->
            <key>NSStringLocalizedFormatKey</key>
            <string>%#@num_followers@</string>
            <!-- 3 -->
            <key>num_followers</key>
            <dict>
                <!-- 3.1 -->
                <key>NSStringFormatSpecTypeKey</key>
                <string>NSStringPluralRuleType</string>
                <!-- 3.2 -->
                <key>NSStringFormatValueTypeKey</key>
                <string>d</string>
                <!-- 3.3 -->
                <key>one</key>
                <string>%d follower</string>
                <!-- 3.4 -->
                <key>other</key>
                <string>%d followers</string>
            </dict>
        </dict>
    </dict>


  1. This key in the .stringsdict is the same as the text being used in our NSLocalizeableString macro. It tells our localization engine to use the info in the value of this key for it’s localization
  2. The NSStringLocalizedFormatKey->%#@num_followers@ key-value pair indicate that the localize string uses variables, and that num_followers is one of those variables.
  3. Our next key is one of the variables listed in the previous step, its value is itself another dictionary that indicates how the localization needs to proceed for this given variable.
    1. This key-value pair indicates that we are handling a plurality rule type. (Actually, right now this is the only type, so this key-value pair never changes).
    2. This key-Value pair (NSStringFormatValueTypeKey -> d) indicates that format specifier is for the integer number d. Other format specifiers could have been used (such as f, g, etc.), but for our example we needed to use the integer specifier d.
    3. – 4. These steps handle the various cases of d. As keys imply, we handle two simple case. If d==1, and otherwise, there are other options as well. These include zero, two, few, and many. In our example (and with English) only one and other are needed.  Other languages or situations (say we wanted to say a user had, “no followers”, “1 follower”, “a pair of followers”, “several followers”, etc) would make use of these other options.

Now that we have our .stringsdict file setup, our last step is to use it. In order for the localization engine to work the key (“%d followers”) must be in our Localizable.strings file. Once that is in place we use the following code to get our localized plural string:

 let localizedString = NSLocalizedString("%d followers", comment: "")
 let localizedPluralString = String.localizedStringWithFormat(localizedString, numFollowers)

Notice that we are first localizing the string with the NSLocalizedSting macro.  The resulting string (localizedString) still contains the “%d”, indicating the need for an integer.  Next, this string is passed into the static string function localiedStringWithFormat (along with the number of followers integer) to access the .stringsdict data.

TL;DR

To localize pluralities add and populate a .stringsdict file:

<dict>
        <key>%d localized string key</key>
        <dict>
            <key>NSStringLocalizedFormatKey</key>
            <string>%#@variable1@</string>
            <key>variable2</key>
            <dict>
                <key>NSStringFormatSpecTypeKey</key>
                <string>NSStringPluralRuleType</string>
                <key>NSStringFormatValueTypeKey</key>
                <string>d</string>
                <key>one</key>
                <string>%d localized string for single case</string>
                <key>other</key>
                <string>%d localized string for plural case</string>
            </dict>
        </dict>
    </dict>

Access this information via the localizing helper methods:

 let localizedString = NSLocalizedString("%d localized string key", comment: "")
 let localizedPluralString = String.localizedStringWithFormat(localizedString, intNumber)


Sources

https://developer.apple.com/library/content/documentation/MacOSX/Conceptual/BPInternational/LocalizingYourApp/LocalizingYourApp.html#//apple_ref/doc/uid/10000171i-CH5-SW10

https://developer.apple.com/library/content/documentation/MacOSX/Conceptual/BPInternational/StringsdictFileFormat/StringsdictFileFormat.html


Localization

Internationalization – 5

So far, we have covered how to internationalize your applications UI and code. We have also covered how to utilize formatters to localize numbers and dates.  With these tools you are able to handle just about every situation requiring localization.

In this post we will cover how to get your strings to translators and iterate through localizations.

Locking Views

So, your ready to have your app translated into new and exciting languages! Thats great! You’ve gone through the all the step necessary to ensure that you UI will handle the different languages correctly and you would like to export the necessary information to give to a translator. However, there is one step you need to take before exporting… Locking! Thats right! You should lock your views so that you don’t accidentally change something that shouldn’t be changed while you are waiting for the translations to be completed.

When you lock a view, you limit what you are allowed to edit on the view. There are four levels of view locking:

  1. Nothing – All view properties may be edited.
  2. All properties – You cannot edit any view properties.
  3. Localizable properties – You cannot change any user-disable strings. Also, you can’t change a limited number of other properties (eg view size).
  4. Non-localizable properties – (Kinda the inverse of the last property) You can change user-visable strings and attributes (like size) but cannot change other attributes.

A good thing to note: by default, views inherit the locking attributes of their superviews. However, you can set the lock attribute individually as well. The nice thing about this is that if your .storyboard or .xib files are finished and you are ready to export for translation, you can simply set the file lock level to Localizable properties, and this lock level propagates to all views included.

Locking a view/file only requires two steps:

  1. Select the view (should this even be a step?)
  2. Open the Identity inspector (⌥⌘3) and select the lock level in the Document section.

Easy peasy, lemon squeezy!

Exporting Localizations

Exporting your files for localization is simple:

  1. Select your project or target you wish to export inside of the Xcode project editor
  2. Select Editor > Export for localization
  3. Set the save location and name

This process results with a folder which contain a .xliff file for each language you have added to your app. These .xliff files are what you give to your translators.  It should be noted that this export also exports your localized Info.plist files as well.

Importing Localizations

Importing a localization is nearly identical to exporting:

  1. Select your project or target you wish to export inside of the Xcode project editor
  2. Select Editor > Import localization
  3. Select a .xliff file you wish to import and click Open.
  4. Click Import.

Xcode handles all the decoding and adding of the localized string files from the .xliff file for you! Just repeat these steps for all the remaining .xliff files and you are done!

Once you’ve imported all your .xliff files you should verify that all the translation .strings files are in place. To do this,  examine each .xib and .storyboard file in your app and insure that they each have all the necessary translations added and that those translations are in the proper language (not the default base language).  You don’t want to be selling an app that you think is localized, only to have all the base language defaults showing up.


TL;DR

  1. Once you are ready to translate your app you should lock your views!
  2. Exporting your app for translation is easy:
    1. Select your project or target you wish to export inside of the Xcode project editor
    2. Select Editor > Export for localization
    3. Set the save location and name
  3. Importing translations is also easy:
    1. Select your project or target you wish to export inside of the Xcode project editor
    2. Select Editor > Import localization
    3. Select a .xliff file you wish to import and click Open.
    4. Click Import.

Sources

https://developer.apple.com/library/content/documentation/MacOSX/Conceptual/BPInternational/LocalizingYourApp/LocalizingYourApp.html

https://en.wikipedia.org/wiki/XLIFF

https://developer.mozilla.org/en-US/docs/Mozilla/Localization/Localizing_XLIFF_files


Localization

Internationalization – 4

Adhere to the user’s settings when formatting, sorting, searching, and parsing data.

So far in our internationalization study we’ve discussed how to localize our UI files and our code. This  ominous heading refers to another portion of internationalizing our code. You may not realize this, but other localities display things differently. They may use a different calendar system. They might even (gasp) use different characters to separate thousands and decimal groups! (Here is a neat list Oracle has produced on some of these variations.)

This article will cover the basics of localizing dates and numbers. So lets dive in!

NumberFormatter

Ok, can I just say I love this class? Perhaps a reviewing statement concerning my programing interests, but its true. I was first introduced to the NumberFormatter while creating my very first iOS application, Heat Tran. Heat Tran is a specialized calculator and I wanted to allow the user to display their numbers in any way they liked (degree, scientific, engineering, etc), mimicking my old TI-89.

As the name implies, the NumberFormatter class is all translating between numbers (NSNumber) and strings (NSString). There is all sorts of customization an NumberFormatter can provide (including significant digit display, integer, and fraction display, currency, and more!).

Lets get started with a simple example. Say we have a number we need to display: 31415.9265359. To translate this into a string that a user would like/expect to see in their location we perform the following steps:

// 1) Get the number (double)
let num = 31415.9265359
// 2) Convert the number (double) into an NSNumber
let nsNum = NSNumber(floatLiteral: num)
// 3) Create an NumberFormatter
let numberFormatter = NumberFormatter()
// 4) Format the formatter.
numberFormatter.numberStyle = .decimal
// 5) Pass the NSNumber into the formater's string function and get your correctly formatted string! Boosh!
numberFormatter.string(from: nsNum)
// returns "31,415.927" 

Well that was easy! If you want more digits displayed you could simply up the minimumFractionDigits

numberFormatter.minimumFractionDigits = 6
numberFormatter.string(from: nsNum)
// returns "31,415.926536"

So thats neat, but how do we set this for a different local? By setting the local property of course:

// Will set it to the current local of the user
numberFormatter.locale = Locale.current; 
// To set it manually to a local (for fun, testing, or whatever!)
numberFormatter.locale = Locale(identifier: "fr_KM")// French Comoros local
numberFormatter.string(from: nsNum)
// prints "31 415,926536"

see now the ‘,’ has been replaced with a ‘ ‘ and that the ‘.’ is now a ‘,’.  A list of different local string identifies can be found here.

One thing to note is that, for most simple number-string conversions (ie if the default values are being used you can use a class method:

class func localizedString(from: NSNumber, number: NumberFormatter.Style)

Simply provide the NSNumber and the style and poof! a localized string!

To learn more about number formatting watch this WWDC video.

DateFormatter

Using the date formatter is virtually the same as using the number formatter:

// 1) Get the Date
let date = Date()
// 2) create the formatter
let dateFormatter = DateFormatter()
// 3) Format the formatter
dateFormatter.locale =  Locale(identifier: "fr_KM")
dateFormatter.dateStyle = .full
// Pass the date into the formatters string method and get the  correctly formatted string!
dateFormatter.string(from: date)
// Prints "mardi 5 décembre 2017"

Easy peasy! It should be noted that DateFormatter also has a class method for quickly getting a localized date string for the users current local:

class func localizedString(from date: Date, dateStyle dstyle: DateFormatter.Style, timeStyle tstyle: DateFormatter.Style) -> String

TL;DR

// For quick number formatting:
NumberFormatter.localizedString(from: <#T##NSNumber#>, number: <#T##NumberFormatter.Style#>)

// For quick date formatting:
DateFormatter.localizedString(from: <#T##Date#>, dateStyle: <#T##DateFormatter.Style#>, timeStyle: <#T##DateFormatter.Style#>)

Sources

https://developer.apple.com/library/content/documentation/MacOSX/Conceptual/BPInternational/InternationalizingLocaleData/InternationalizingLocaleData.html

https://developer.apple.com/documentation/foundation/dateformatter

https://developer.apple.com/documentation/foundation/numberformatter


Localization

Internationalization – 3

In our previous two posts we covered how to localize our UI files. In this post we will show how to internationalize our code! Lets start with an example:

Say we are going to set the text for a UILabel in the code (either because the UI was developed programmatically, or because the text in the label is situational). To set the text, we would do something like this:

label.text = "I like cheese!"

As you may have noticed, “I like cheese” itself is not very localized…  With the UI files we were given a .strings file to work with and created more as we added other languages.  When internationalizing our code, we create our own .strings file to work with. We do so by:

  1. Pressing cmd-N (⌘-N) to add a new file.
  2. Scroll down to the Resource section and select the “Strings File”
  3. Add a file name and select a location and we are ready to rock!

If you remember from our previous posts when the UI localized our text the .strings file contained a key-value sort of pairing that looked like this:

"GU8-dk-kKo.placeholder" = "Username";

where the LHS referenced the UI objectID and attributed, and the RHS is the displayed text (the part that is localized). The .strings file we are using will follow a similar format.  Add the following line to your file:

"I like cheese!" = "I like cheese!";

Just like in the other .strings files, the LHS is the key used for localization lookup, the RHS is the text that will be passed into your controllers. Now lets see how to access the information in this file.  We do so by using the NSLocalizedString(key: String>, comment: String>) function. As you clever developers have guessed, the key is what is in the LHS of our .strings file, the comment can be left as an empty string for now. To update the code above to use the localized string change the line like so:

label.text = NSLocalizedString("I like cheese!", comment: "")

Now, you may be thinking, the whole “I like cheese!” = “I like cheese!”; think looks a little ridiculous.  Well, it is, and I don’t recommend you do it that way.  I like to follow the paradigm that interface builder uses when providing its .strings files: use an object related description as the key for the text. In our case we might change the text to something like this:

// In the .swift file:
label.text = NSLocalizedString("cheeseLabel.text", comment: "")

// In the .strings file
"cheeseLabel.text" = "I like cheese!";

This way, your references are not simply a reiteration of text, but rather a string which gives context to how the string is being used.  Another benefit to doing this is that if you decide to change the localization from something like “I like cheese!” to say “Cheese is great!” your .strings file doesn’t contain any strange statements:

"I like cheese!" = "Cheese is great!";
// VS
"cheeseLabel.text" = "Cheese is great!";

One thing you should be aware of is that you shouldn’t overload keys, or to compose strings from multiple keys.  For example. say we have two phrases, “exit room” and “exit building” in our app It could be tempting to make keys that combine these like this:

"exit" = "exit";
"room" = "room";
"building" = "building";

and then to combine them something like this:

label.text = NSLocalizableString("exit",comment:"") + " " + NSLocalizableString("room",comment:"")

The issue with this is that different languages might combine these terms differently (genders, order, etc).  Thus you should always use a separate key-value pair for each unique phrase


TL;DR

  • Localize your source code using the NSLocalizableString method: NSLocalizedString(key: String>, comment: String>)
  • Always use a separate key-value pair for each unique phrase.


Sources

https://developer.apple.com/documentation/foundation/nslocalizedstring

https://developer.apple.com/library/content/documentation/MacOSX/Conceptual/BPInternational/InternationalizingYourCode/InternationalizingYourCode.html#//apple_ref/doc/uid/10000171i-CH4-SW3

http://nshipster.com/nslocalizedstring/